Introduction to Yoga Locust Pose
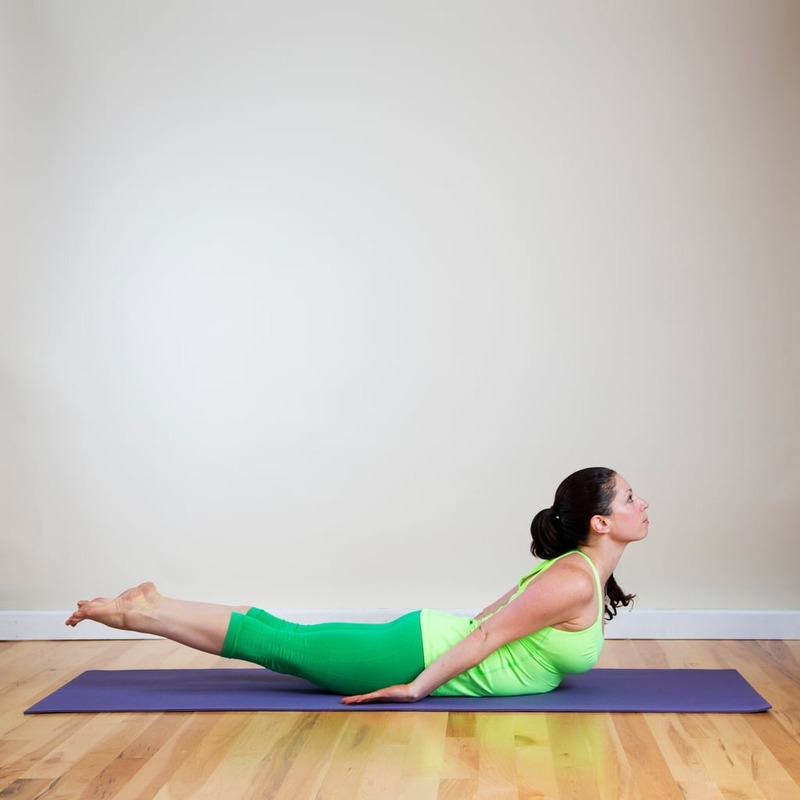
Yoga Locust Pose, or Salabhasana, is a fundamental yoga asana with a deep impact on the body. It is an intermediate level backbend pose performed lying on the stomach. This pose is unique because it does not require weight to be placed on the hands or arms, making it accessible for beginners. Originating from the Sanskrit words ‘Salabha’ which means ‘locust’, and ‘Asana’, meaning ‘pose’, it mirrors the shape of a locust in the final posture.
Salabhasana serves as a foundation for more advanced backbends and is often practiced to prepare the body for poses like Bow Pose (Dhanurasana) and Upward Bow (Urdhva Dhanurasana). By practicing Locust Pose, you can align your body correctly, which is essential for executing deeper backbends with ease. Regularly incorporating this asana can enhance the flexibility and strength of the spine and the muscles in the upper torso. It also offers an opportunity to strengthen the legs and buttocks while improving overall posture and relieving fatigue.
Key Benefits of Practicing Locust Pose
Practicing Locust Pose, or Salabhasana, offers several benefits that enhance both physical and mental health. Here are the key advantages of incorporating this pose into your yoga routine:
- Strengthens the Back Muscles: Locust Pose targets the entire back, helping to tone and strengthen the muscles. This is crucial for anyone looking to improve their posture and alleviate back pain.
- Enhances Flexibility: Regular practice of this pose increases flexibility in the spine as well as the legs and hips. Flexibility is key to preventing injuries and enhancing overall body movement.
- Improves Digestive Health: By lying on the belly, the pose applies gentle pressure to the abdominal organs. This stimulation can help to relieve digestive issues such as constipation and indigestion.
- Stress Relief: Salabhasana requires focus and breathing that can help calm the mind and reduce stress. The pose’s uplifting effect can lead to a reduction in anxiety and promote a sense of well-being.
- Prepares for Advanced Poses: As a foundational backbend, Locust Pose prepares the body for more challenging backbends. Mastering this pose ensures better alignment and readiness for deeper stretches.
From enhancing muscle strength and flexibility to calming the mind and preparing the body for advanced yoga poses, Locust Pose is a beneficial addition to any yoga practice.
Preparatory Poses for Optimizing Your Locust Pose
Before you dive into Locust Pose, it’s important to prepare your body. Warming up with specific asanas can help prevent injury and improve your Salabhasana. Here are some effective poses to include in your warm-up routine:
- Cobra Pose (Bhujangasana): Start with this gentle backbend to warm up the spine. Lie on your belly and lift your chest using your back muscles.
- Cat-Cow Stretch (Marjaryasana-Bitilasana): These poses increase spinal flexibility. They involve arching and rounding your back rhythmically with your breath.
- Child’s Pose (Balasana): This resting pose stretches the lower back. It’s great to relax your spine between more intense stretches.
- Bow Pose (Dhanurasana): While more intense, Bow Pose is a superb lead-up to Locust. It opens the chest and shoulders and strengthens the back.
- Downward Facing Dog (Adho Mukha Svanasana): This pose elongates the spine and strengthens your upper body, which is beneficial for Salabhasana.
Incorporate these preparatory poses into your practice to safely arrive at an effective Locust Pose. Remember to move slowly and breathe deeply in each initial pose, tuning into your body’s needs and limitations. With a well-prepared body and a focused mind, your locust pose yoga practice will both strengthen and rejuvenate your back, preparing you for more advanced backbends.
Step-by-Step Instructions for Performing Locust Pose
To perform Locust Pose effectively, follow this detailed, step-by-step guide:
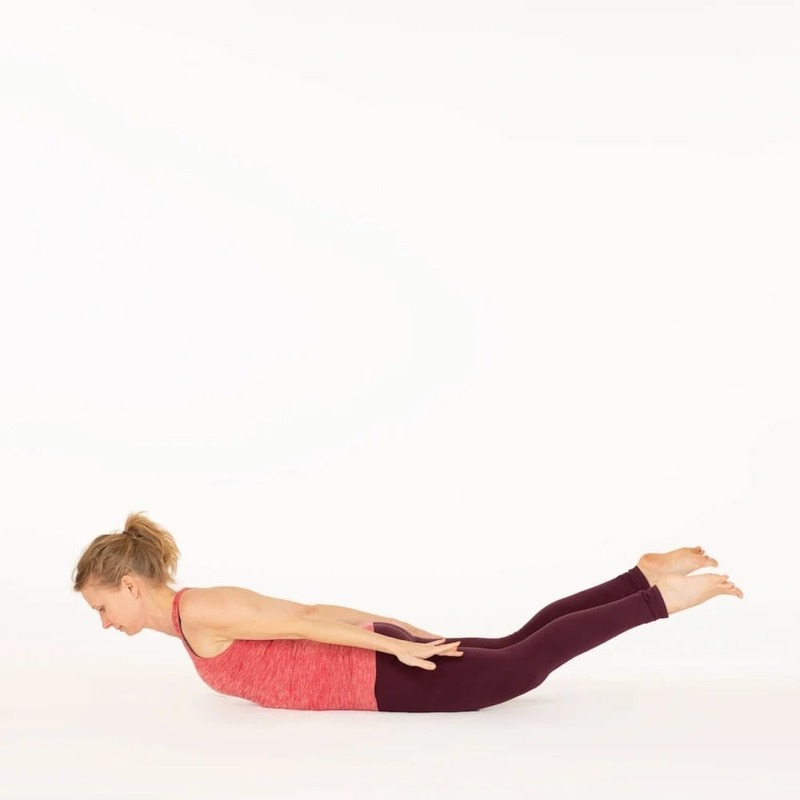
- Start Position: Begin by lying flat on your stomach on your yoga mat. Keep your arms at your sides, palms facing upward, and legs extended straight behind you, hip-width apart.
- Engage Your Legs: Firmly press the tops of your feet into the mat. Engage your thigh muscles and slightly lift your legs off the mat. Ensure your hips remain even.
- Lift the Upper Body: Inhale deeply, and as you exhale, lift your head, chest, and arms off the mat. Extend your arms back toward your feet with palms facing down. Lift through the sternum and keep your neck neutral.
- Intensify the Pose: Increase the lift from your inner thighs to the ceiling, keeping the legs long and active. Reach through the balls of your feet to elongate the legs further.
- Maintain the Pose: Hold the pose for about 30 seconds to a minute, depending on your comfort. Keep your breath smooth and even to maintain a steady lift and optimal alignment.
- Release the Pose: On an exhalation, gently lower your legs, chest, and arms back to the mat. Rest your cheek on the mat and relax your arms alongside your body.
Repeat: You may repeat the pose a few times, alternating the resting cheek on the mat between repetitions to balance the neck muscles.
By following these instructions closely, you can maximize the benefits of Locust Pose, enhancing the strength and flexibility of your back and preparing your body for more advanced yoga backbends.
Modifications and Variations to Customize Your Practice
Locust Pose, or Salabhasana, can be adjusted to fit your skill level or comfort. Here are some modifications and variations:
- For Beginners: Keep your feet on the floor to reduce strain.
- Leg Lifts Only: Lift just the legs, keeping your upper body still, to strengthen your lower back.
- Hands Under Shoulders: Use your hands for support and raise only your lower body.
- Deepen the Stretch: Interlace your fingers behind you and lift higher, stretching your shoulders.
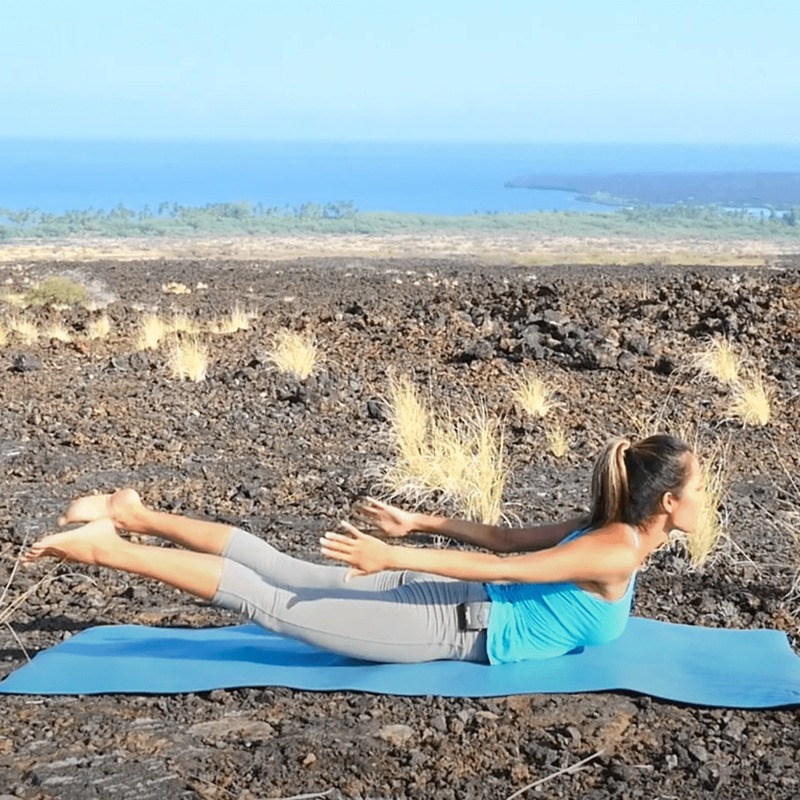
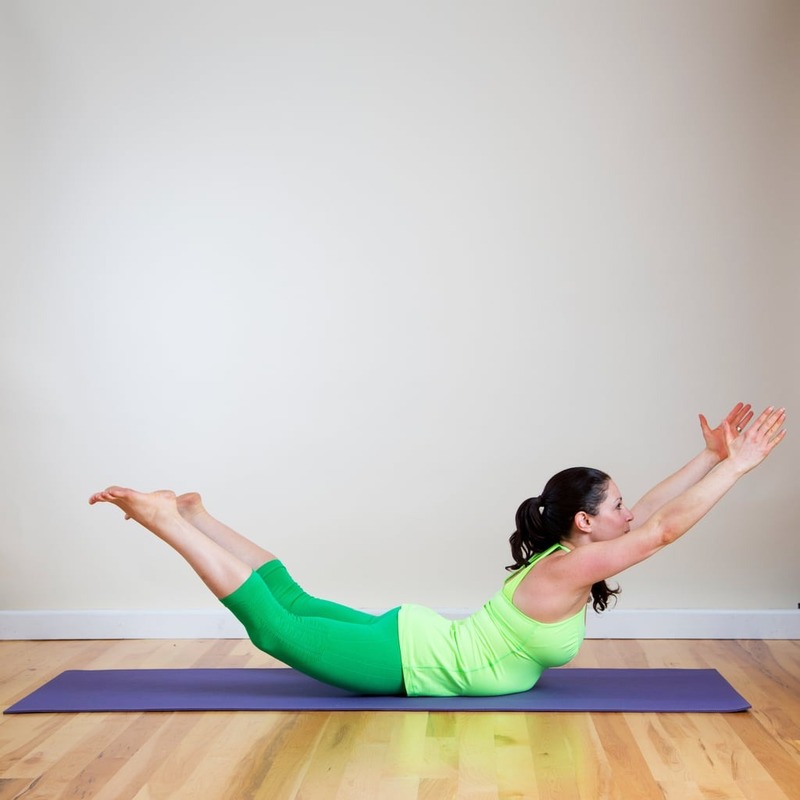
- Arms Extended: Want more challenge? Stretch your arms in front of you, lifting both arms and legs.
- One Side at a Time: Raise one arm and the opposite leg, then switch, to build balance and strength.
- Arm Variations: Spread your arms to the sides, like wings, for a different feel and more work on your upper back.
By using these ideas, you can tailor Locust Pose to your needs. Respect your body’s signals and make changes to avoid strain. Remember, focus on form over height or depth. Proper form is key to gaining the full benefits and preventing injury. As you progress, try more challenging variations to further your practice.
Common Mistakes and Tips for Proper Alignment
Practicing locust pose yoga requires attention to detail to avoid common mistakes. Here are some tips for proper alignment to enhance your practice:
- Legs Misaligned: Ensure your legs are parallel and hip-width apart. Avoid turning your feet in or out.
- Straining the Neck: Keep your gaze downward and neck long. This protects your neck from strain.
- Using Momentum: Lift into the pose using muscle strength, not momentum, to prevent injury.
- Forgetting to Breathe: Maintain steady, even breaths. This helps to remain focused and steady.
- Overarching the Back: Focus on lengthening your spine, not just lifting high, to avoid compressing your lower back.
- Rushing the Pose: Move slowly into and out of the pose. This ensures that every muscle group is engaged properly.
Correcting these mistakes will result in a more effective and safer locust pose experience. Listen to your body and make adjustments as needed for a balanced practice.
Sequence Integration: How to Include Locust Pose in Your Yoga Flow
Integrating the Locust Pose, or Salabhasana, into your yoga sequence can enhance your practice significantly. Here’s how to seamlessly incorporate it into your flow:
- Start with Warm-Up Poses: Begin your session with gentle stretches such as the Cat-Cow Stretch or a few minutes of Sun Salutations. These exercises warm up your body, making it more receptive to the benefits of Locust Pose.
- Progress to Preparatory Poses: Engage in poses that specifically prepare your body for Locust Pose. Perform poses like Cobra Pose and Bow Pose. They help open up your back and strengthen muscles necessary for the Locust Pose.
- Insert the Locust Pose: After the preparatory poses, transition into the Locust Pose. Ensure you follow the detailed steps outlined earlier to achieve the correct form and maximize benefits.
- Follow with Complementary Poses: After Locust Pose, engage in poses that counterbalance the intense backbend. Suitable poses include Child’s Pose and Downward Facing Dog. This helps in lengthening and relaxing the spine after the compression.
- End with Deep Stretches: Conclude your sequence with deeper stretches or seated poses like Seated Forward Bend and Butterfly Pose. These will help soothe your body and aid in muscle recovery.
- Conclude with Savasana: Always end your session with Savasana. It provides your body with a chance to rest and integrate the benefits of the practice.
By integrating Locust Pose into your flow with these steps, you make your practice more dynamic and beneficial. It offers a smooth transition and balance between poses, enhancing both your strength and flexibility.
Cooling Down: Postures to Relax after Locust Pose
After focusing on the invigorating Locust Pose in your yoga sequence, it’s vital to integrate cooling down exercises. These postures help in gradually relaxing the body, stabilizing the heart rate, and integrating the benefits of the Locust Pose into your practice. Here are some effective cooling-down postures to consider:
- Child’s Pose (Balasana): A classic relaxation pose, Child’s Pose allows your spine and neck to stretch gently while easing your mind and reducing stress.
- Downward Facing Dog (Adho Mukha Svanasana): This pose helps to lengthen and release tension from your spine, providing a counterstretch to the backbends performed during the Locust Pose.
- Supta Padangusthasana (Reclining Hand-to-Big-Toe Pose): This lying-down posture aids in stretching the hamstrings and calming the nervous system, ideal after an intense practice.
- Bharadvajasana (Bharadvaja’s Twist): This seated twist promotes relaxation in the spine and restores balance across the body.
- Savasana (Corpse Pose): Conclude your yoga session with Savasana. It relaxes the whole body and allows you to absorb the energizing effects of your practice in a state of deep rest.
Incorporating these poses after doing the Locust Pose, or Salabhasana, ensures a balanced conclusion to your yoga practice. This range of postures encourages a gradual transition from an energized state to one of complete relaxation. Always remember to breathe deeply during each pose and listen to your body’s needs, adjusting your practice accordingly.
